Add a User to IGC™
You can add a user to IGC™ and assign permissions.
You can grant a combination of the following permissions to a user depending on the access required.
- ADMIN - Can add and edit user accounts and set user permissions to Platform components.
- APPROVER - Can be set as an Owner for elements and can approve elements in order to publish them.
- AUTHOR - Can create child elements - Processes, Scenarios, Roles, Tasks, and assets such as Terms, Rules, etc.
- USER - Read-only access. This type of user can add comments, share a URL and view change history for an asset, but cannot sponsor an asset or otherwise edit it.
NOTE: If a user has User permission for a component, that component does not display in the Quick Add list because the user cannot add the asset. Additionally, guidance related to adding or editing assets does not display for a user with User permission.
NOTE: To access the IGC™, all users must have User permission for all IGC™ components, and this permission cannot be removed. It is granted by default to all users.
NOTE: If multiple permissions are assigned to a user, the level with the broadest permission is used. For example, if a user is assigned as both a User and an Approver, IGC™ grants the user Approver access.
NOTE: If a user does not have permission to add an asset, it displays dimmed with a lock icon on the Quick Add menu.
Permission can be granted to these components:
- Data Catalog — Controls access to Systems and Data Sets.
- Glossary — Controls access to terms.
- Strategy — Controls access to Visions, Missions, Goals and Initiatives.
- Platform — Controls access to IGC™. Admin permission at the Platform level is required to add users to IGC™.
- Process Designer — Controls access to the Process Designer.
- Policy — Controls access to policies.
Users can change certain settings for their own accounts from their profile. Refer to Update My Profile for more information.
To add a user:
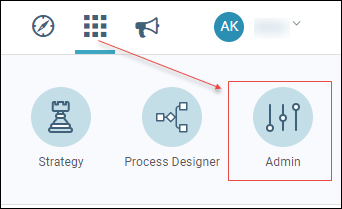
- Click the Applications icon.
-
Click the Administration icon in the options panel.
-
Click Add New to create a user account.
NOTE: This opens a detail modal where you can create an account for a new user and grant the user access to the IGC™.
- Enter First Name.
- Enter Last Name.
-
Enter Email.
NOTE: A valid email address is required.
-
Enter Locale.
NOTE: Or, leave en (English) as the default. The Locale sets the date format for IGC™.
-
Select Persona.
NOTE: Persona controls who has access to the Dashboard page. Values are:
- Director – The Director persona has access to the Dashboard. Refer to IGC™ Dashboard for more information.
- Default – Default persona for the IGC™ with no access to the Dashboard.
-
Click the Badge icon to change badge color (optional).
-
Click Custom Permissions.
NOTE: The Custom Permissions tab is where you grant the user permissions to the different components within IGC™.
-
Click the checkboxes to assign Permissions by component.
- Click Save.